Have you ever wanted to chat with an AI assistant about your website’s Google Search Console data and even see charts of your SEO performance? The Google Search Console MCP server makes this possible. MCP stands for Model Context Protocol, an open protocol that standardizes how applications (like AI chatbots) can connect to data sources and tools
Table of Contents
- Prerequisites
- Step-by-Step Setup Instructions
- 2. Install Required Software and Tools
- 3. Download the GSC MCP Server Code
- 4. Create a Python Virtual Environment
- 5. Install the Required Python Packages
- 6. Configure and Launch the MCP Server
- Configuration Details and Optimization
- Testing the Setup
- Troubleshooting
Think of an MCP server like a “plugin” that lets your AI assistant (for example, Anthropic’s Claude) securely access specific data – in this case, your Google Search Console (GSC) insights – and present it in a conversational way.
In simple terms, the GSC MCP server is a lightweight program you run on your computer that bridges Google Search Console with an AI. Once set up, you can ask your AI assistant questions about your search traffic, rankings, and more, and get answers with real data. For instance, the assistant could compare two time periods of your site’s performance, identify SEO improvements, or generate visual reports like bar charts and line graphs based on your GSC data
This means you can analyze click-through rates, impressions, and ranking changes just by chatting with Claude, making SEO analysis more interactive and intuitive.
Why use the GSC MCP server? It allows you to leverage the power of a large language model (LLM) to interpret your Search Console data. You’ll be able to ask natural language questions (e.g. “What were my top queries last month?”) and even request visualizations, and the AI will fetch and explain the data for you. This can save time for SEO professionals and website owners by turning raw data into insights and charts within seconds. It’s like having a smart SEO analyst at your fingertips, using your own Search Console data.
In this beginner-friendly guide, we’ll walk through setting up the GSC MCP server step by step – from the initial setup of Google API credentials to installing the software and verifying it works. No prior coding knowledge is required, and each step will be explained clearly. By the end, you’ll be able to chat with Claude (or another MCP-compatible AI client) and have it pull live Search Console analytics for your website. Let’s get started!
Prerequisites
- Google Account with Search Console access: You should have a Google account that has access to at least one website in Google Search Console (your site should be verified in GSC). If you haven’t used Google Search Console before, set that up first for your website.
- Google Cloud Project: We will create credentials through Google Cloud, so you’ll need a Google Cloud account (you can use your regular Google account) and a project set up in the Google Cloud Console. This is where we’ll enable the Search Console API and create a service account. (If you’ve never done this, don’t worry – we’ll cover the steps).
- Basic Command-Line Knowledge: You should be comfortable entering commands in a terminal/command prompt. This guide will provide the exact commands to run, so even if you haven’t done this before, you can follow along. For example, we will use commands like
python --versionorgit clone .... As long as you can open a command line on your computer and type in the provided commands, you’ll be fine. - Python (3.11 or newer) – The MCP server is a Python program, so you need Python installed on your system. You can check if you have it by running
python --version(orpython3 --versionon some systems) If you don’t have Python, download it from the official site and install it. This guide assumes Python is properly installed and added to your system PATH (so that you can callpythonfrom the command line). - pip (Python package manager) – This usually comes with Python, but verify by running
pip --version(orpip3 --version) If pip isn’t found, you may need to install it or ensure it’s on your PATH. Typically the latest Python installation includes it. - uv (Python project & environment tool) – The instructions from the repository use a tool called
uvto manage the Python environment and dependencies.uvis a handy utility that creates isolated environments and installs packages (similar topip, but with some conveniences). Check if it’s installed by runninguv --version If this returns a version number, great. If not, you can install uv by runningpip install uv or following the official docs (We’ll also show alternatives if you prefer not to useuv.) - Claude Desktop – Claude is the AI assistant we’ll use in this guide. Specifically, Claude Desktop is the application that allows Claude to run with plugins (MCP servers). Download and install Claude Desktop from the official site if you haven’t already. Claude Desktop is available for Windows and macOS. This is the interface where you’ll chat with the AI and where the new Search Console tools will appear once configured.
- Git (optional) – Git is a version control tool. We’ll use it to clone (download) the MCP server code from GitHub. If you don’t have Git, it’s optional because you can download the ZIP file instead. To check if Git is installed, run
git --version If it’s not, you can install it from the official site, or skip installing Git and use the manual download method we’ll describe. - Text Editor: You might need a text editor to edit a configuration file. Notepad (Windows) or any basic text editor is fine. This is just to update some file paths in the Claude config if needed.
Step-by-Step Setup Instructions
Now that we have what we need, let’s move on to the actual setup steps.
We will break the setup into four main parts for clarity:
- Generate Google Cloud Credentials – Create a service account in Google Cloud and get a JSON key file for it. Then give that service account access to your Search Console data.
- Install Required Tools – Ensure Python, pip, uv, and Claude Desktop (and Git, if using) are installed.
- Set Up the MCP Server – Download the GSC MCP server code, set up a Python environment, install dependencies, and register the server with Claude.
- Enable Search Console Tools in Claude – Launch Claude and verify the new tools are working by running a test query.

Generate Google API Credentials (Service Account JSON)
The first step is to create credentials that the MCP server will use to access your Google Search Console data. We will do this by creating a Service Account in Google Cloud and downloading its key as a JSON file. This file will authorize the MCP server to pull data from your Search Console.
Here’s how to set up the service account:
- Go to Google Cloud Console: Visit the Google Cloud Console in your browser. Make sure you’re logged in with your Google account.
- Select or Create a Project: In the top navigation bar of the Cloud Console, there is a project selector (it might say “Select a project” or show a project name if you have one). Click it. Choose an existing project to use for this, or create a new project (for example, you could create one called “GSC MCP” or similar for clarity).

- If you created a new project, you’ll need to enable the Google Search Console API for that project. To do this: with the project selected, click on “APIs & Services” in the left sidebar (or in the dashboard’s “Quick access” section). Then click “Enable APIs and Services”. In the API Library, search for “Google Search Console API”, click on it, and then click “Enable”. (If you already had a project with this API enabled, you can skip enabling it again.)


- Open the Service Accounts page: In the Cloud Console left menu, navigate to IAM & Admin > Service Accounts. This is where we manage service accounts for the project.

- Create a New Service Account: Click the “Create Service Account” button. Give the service account a name (for example, “gsc-access-service-account”). The service account ID will be generated based on the name; you can leave the defaults. After naming, click “Create and Continue”.

- Assign Roles (Permissions): The next step will ask you to grant the service account access to your project. For simplicity, you can choose a role like Editor or Owner which gives broad access(If you want to be more strict, the Search Console API specifically might work with just the Owner of Search Console property, but since we will add the service account in Search Console itself, the role here in Google Cloud can be Editor for now. It mostly matters if you use other Google Cloud resources.)
- After selecting a role, click “Continue”, then “Done” (we don’t need to grant specific users access to this service account in the next screen). Now your service account should be created.
- Grab the email on the service account screen and drop it into a text editor for later

- Grab the email on the service account screen and drop it into a text editor for later
- After selecting a role, click “Continue”, then “Done” (we don’t need to grant specific users access to this service account in the next screen). Now your service account should be created.
- Create a JSON Key for the Service Account: You should now see your new service account in the list. We need to create a key for it:
- Find your service account in the list and click the three dots on the right side (“More actions” or the three vertical dots)
- Click “Manage keys”
- In the Keys section, click “Add Key” > “Create new key”
- Select JSON key type and then “Create”

- Your browser will download a JSON file – this is your service account credentials file. Keep it safe. (It’s a good idea to move it to a convenient location, and note the file path. We’ll need the file path soon. For example, on Windows it might download to
C:\Users\<YourName>\Downloads\as something likeproject-123abc-abcdef.json.)
- Grant Search Console Access to the Service Account: Now we have a service account that could query the API, but by default Google Search Console won’t allow it to see your site’s data. We have to add this service account as a user of your Search Console property:
- Go to Google Search Console and sign in.
- Choose the website property you want to allow access for (from the dropdown if you have multiple sites).
- You may also choose to grant access to multiple search console properties
- Click Settings (gear icon) on the left menu, then under Users and Permissions, click “Add User”
- In the Add user dialog, enter the email address of the service account. This email was shown in the service account creation page (it typically looks like
your-project-id@your-project.iam.gserviceaccount.com). You can also find it in the JSON file (look for the"client_email"field in the JSON). Choose the permission level for this service account. You can start with Restricted (read-only) if you only need to fetch data. - If you plan to use the AI to submit sitemaps or perform actions, you might need Full access. For security, it’s best to give the minimum needed access – you can always change it later. Click Add. The service account is now added as a user to your Search Console property. This is crucial: without this step, the server would get authorization errors when trying to access your data.
We’re done with the Google Cloud setup. Keep the JSON file handy (remember its location), as we’ll use it during the MCP server configuration.
2. Install Required Software and Tools
Next, we need to ensure the software tools needed for running the server are installed on your computer. This includes Python and related tools, as mentioned in Prerequisites. Here’s a quick rundown and how to install/check each:
Python: Make sure Python 3.11+ is installed. Open your terminal (or Command Prompt on Windows) and type:
python --version- (On some macOS/Linux setups you might need to use
python3 --version.) This should output a version number if Python is installed. If you get an error or a version below 3.11, download the latest Python from the official site and install it. Ensure you check the option to add Python to your PATH during installation on Windows. After installing, try the version check again.
pip: After installing Python, pip (the package installer) is usually included. Verify by running:
pip --version- (Or
pip3 --versionon some systems.) This should show a pip version if available. If pip isn’t found, you may need to install it. You can use Python to ensure pip is there by runningpython -m ensurepip --upgradefollowed bypython -m pip install --upgrade pip But in most cases, this won’t be necessary if Python was installed correctly.
uv: uv is a tool that will help us create an isolated environment and install packages easily. Think of it as a helper for Python projects. Check if it’s installed by running
uv --version- If you see a version number, you have it. If not, install it by running:
pip install uv- This will install uv via pip (you might need to prepend with
python -m pip install uvifpipon its own doesn’t work). Alternatively, uv has installers and other methods, but pip is simplest. After installing, you can runuv --versionagain to confirm it’s available.
Claude Desktop: Ensure Claude Desktop is installed. If not, download it from Anthropic’s websiteand install it like any other application. Once installed, you don’t need to open it just yet; we’ll configure it after setting up the server.
Git (optional): If you plan to use Git to download the project, ensure it’s installed
git --version- If it’s not, you can install Git from git-scm.com However, if you prefer not to use Git, you can download the code as a ZIP file from GitHub without installing Git – we’ll cover that below.
3. Download the GSC MCP Server Code
The Google Search Console MCP server code is hosted on GitHub in the repository seotesting-com/gsc-mcp-server. You need to get these files onto your computer.
There are two ways to download the code:
Option A: Clone with Git (if you have Git installed):
- Open a terminal or command prompt in the directory where you want to put the project. For example, you might choose your Desktop or Documents.
- Run the command:
git clone https://github.com/seotesting-com/gsc-mcp-server.git- This will create a folder named
gsc-mcp-serverand download all the files into it
3. After cloning, navigate into the project directory:
cd gsc-mcp-server- Now you should be inside the project folder (where a file named
server.pyand others exist).
Option B: Download ZIP (if you don’t have Git):
- Navigate to the GitHub repository page in your web browser: https://github.com/seotesting-com/gsc-mcp-server
- On that page, look for a green “Code” button. Click it, and then click “Download ZIP”
- Save the ZIP file to your computer, then extract (unzip) it to a folder. For example, you might extract it to your Documents folder. The extracted folder might be named something like
gsc-mcp-server-main(if downloaded from main branch). - Open your terminal/command prompt and navigate to that extracted folder: e.g.,
cd ~/Documents/gsc-mcp-server-mainon macOS/Linux orcd %USERPROFILE%\Documents\gsc-mcp-server-mainon Windows (adjust the path to where you extracted).
Now, whether you cloned via Git or extracted the ZIP, you should have the project files on your machine and your terminal’s current directory should be inside the project folder.
4. Create a Python Virtual Environment
It’s a good practice (and the recommended approach) to create a virtual environment for the project. This keeps the project’s Python libraries separate from your system’s libraries, avoiding version conflicts.
** Ensure that you have your terminal open inside server folder

We’ll use uv to create and activate the virtual environment, since it’s quite straightforward:
Create the virtual environment: In the terminal (still in the gsc-mcp-server folder), run:
uv venv- This command will create a virtual environment (by default, it will create a folder named
.venvinside the project directory). It sets up an isolated Python for this project.
Activate the virtual environment: After creating, you need to activate it:
- On Windows, run:
.venv\Scripts\activate- On macOS/Linux, run:
source .venv/bin/activateThis changes your terminal session to use the project’s Python environment. You’ll know it worked because your prompt might now start with (.venv) or similar, indicating the venv is active.

If you run into any issues creating or activating the venv, ensure that uv was installed properly. If uv isn’t working for you, an alternative is to use Python’s built-in venv module: for example, python -m venv .venv to create it, then activate as above. But using uv simplifies some next steps.
5. Install the Required Python Packages
With the virtual environment active (you should see (.venv) in your terminal prompt now), install the necessary dependencies for the MCP server.
In the project folder, run:
uv syncThis command tells uv to install all packages listed in the pyproject.toml/requirements.txt of the project, locking versions as needed. It’s essentially installing things like the Google API client library, the MCP framework, pandas, etc., which the server needs.
If you prefer or if uv sync fails for some reason, you can install with pip directly as an alternative:
pip install -r requirements.txtThis reads the requirements.txt file and installs the listed packages. Use this if not using uv. (The project might specify dependencies in pyproject.toml, in which case uv sync is doing the work; but they also included a requirements.txt for convenience.)
This step may take a little time as it downloads and installs Python libraries. You should see messages of packages being installed. Once done, the environment is set with all needed libraries.
6. Configure and Launch the MCP Server
Now comes the integration step: making Claude Desktop aware of the new MCP server and pointing it to your credentials. The GitHub repository provides a one-line command to install (register) the server with Claude:
Ensure you are still in the project directory with the virtual environment activated. Then run:
mcp install server.py -v GOOGLE_APPLICATION_CREDENTIALS="<path to your JSON credentials file>"Replace "<path to your JSON credentials file>" (including quotes) with the full path to the service account JSON file you downloaded in Step 1
For example, on Windows it might look like:
mcp install server.py -v GOOGLE_APPLICATION_CREDENTIALS="C:\Users\YourName\Downloads\gsc-credentials.json"On macOS/Linux, for example:
mcp install server.py -v GOOGLE_APPLICATION_CREDENTIALS="/Users/yourname/Documents/gsc-credentials.json"This command does a few things:
- It tells the MCP framework to “install” (register) a server defined by
server.py(which is the main script of the GSC MCP server). - The
-v GOOGLE_APPLICATION_CREDENTIALS=...part sets an environment variable that the server will use. Google’s libraries look for theGOOGLE_APPLICATION_CREDENTIALSenvironment variable to find your service account key. By providing it here, we ensure the server knows where to find your JSON key
If the command runs successfully, it typically modifies Claude Desktop’s configuration to add this new tool. Essentially, it’s as if we manually edited Claude’s config file to include the Search Console MCP server, but mcp install automates it.
Note: If for some reason the mcp command is not found, it might be that the MCP package wasn’t installed in your environment. You could try installing it with pip install mcp and then rerun the above command. Also ensure your virtual env is active when running it.
After running that, you have effectively set up the server. One more step:
- Restart Claude Desktop: If Claude Desktop was open, close it completely. (On Windows you may need to exit the app from the system tray or terminate the process; on Mac quit the app fully. In some cases, you might even check Task Manager/Activity Monitor to ensure it’s not lingering) Then start Claude Desktop again. If it wasn’t open, just open it now fresh.
Claude Desktop reads its config on startup, so restarting ensures it picks up the new MCP server configuration we added.

Configuration Details and Optimization
Most of the configuration is handled by the steps above, but let’s double-check and discuss some settings:
- Claude Desktop Config File: Claude Desktop has a config file (often at
claude_desktop_config.json). Themcp installcommand should have added an entry for “Search Console Analytics” (or similar) in that file. This entry includes the command to run the server (usinguvand pointing toserver.py) and the environment variable with the path to your credentials. If you open Claude’s settings (File > Settings > Developer tab in Claude Desktop), you should see “Search Console Analytics” listed as a tool, and it should show a status (hopefully “running”). We will verify this in the Testing section. - Verifying the Credentials Path: The most important configuration is the environment variable
GOOGLE_APPLICATION_CREDENTIALSwhich should point to your JSON file. If you ever need to change the location of your credentials file, you would update this path in the config or rerun the install command with the new path. - Optimization – Using Restricted Access: If you only granted Restricted access to the service account in Search Console (view data only), the tools that write data (like submitting a sitemap or requesting indexing) will not function. This is okay if you intended read-only usage. It’s a security best practice to use restricted access if you don’t need to perform actions. You can always change the permission to Full in Search Console if needed for certain tasks.
- Performance Settings: The MCP server will fetch data via the Search Console API. By default, queries (for search analytics) can retrieve up to 25,000 rows per request, and the API itself has some limits (like ~50,000 rows per day per search type). If you plan to run very large queries or frequent queries, be mindful of these limits. For normal usage (like top 100 queries, comparisons over a few months), you should be well within limits. If you hit quota errors, you might need to slow down or request less data per query. Usually, for best performance, ask for only the data you need (specify date ranges or dimensions as needed) rather than pulling everything every time.
- Automatic Start: Thanks to the configuration, Claude Desktop will automatically launch the MCP server when needed. You don’t have to run the server manually each time; whenever you invoke a Search Console tool in Claude, it will start the server (if not already running). The config ensures Claude knows how to start it (using the
uvcommand and the Python environment you set up). - Where the Data Lives: Note that all this is running on your local machine. The service account key is on your computer, and data fetched goes to Claude (running on your machine) and is not sent to any third-party beyond Google’s API. This is good for security – your data stays within your control. Just keep that JSON key safe and don’t share it.
With the server installed and configured, let’s test that everything is working properly
Testing the Setup
Now for the fun part – verifying that the MCP server is up and running with Claude, and making sure we can fetch some Search Console data via the AI.
1. Check Claude’s Tool List: Open Claude Desktop and start a new chat (or use an existing one). Look at the chat input interface – you should notice an icon or indicator for tools. For example, Claude Desktop might show a small toolbox icon with a number, like “5” indicating five MCP tools are available. This corresponds to the tools provided by the Search Console MCP server.
If you see something like the above, it means Claude has loaded the Search Console tools. (If not, refer to Troubleshooting below.)
2. Run a Test Query: Try asking Claude something that uses the Search Console data. For a first test, it’s good to use a simple tool like listing your verified sites. For example, you can type:
List all my verified sites in Google Search Console.3. Allow the Tool Execution: Claude Desktop will prompt you for permission because it’s about to run an external tool (the MCP server) on your behalf. You should see a popup asking to allow the tool action, mentioning “Search Console Analytics (local)” and the specific function (like Run list_sites from Search Console Analytics)
- Click Allow (you can choose “Allow for this chat” which means you trust this tool for the duration of the conversation, or “Allow once” to approve just this single action). Once you allow, Claude will pass the request to the MCP server.
4. Receive the Data: After a moment, Claude should respond with the output of the tool. For the “list sites” query, it should list the websites (properties) that are in your Search Console account, possibly with some basic info about each. If you see your sites listed, congratulations – the server is working and retrieving real data!
You can try other queries now. Here are some example prompts you might test out:
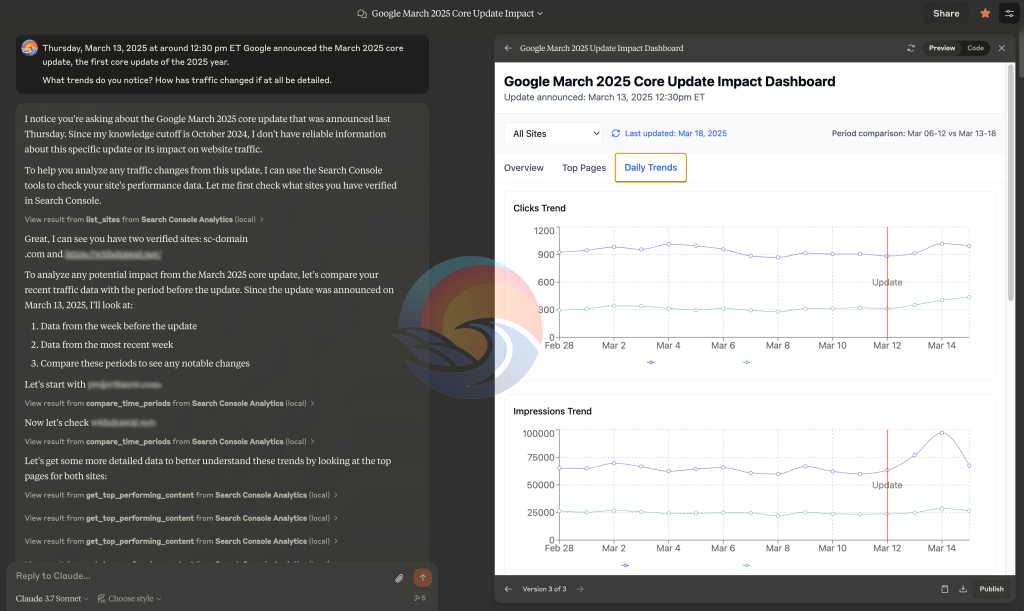
- “Show me search analytics for example.com from January 1 to January 31, 2025.” – This should trigger a query for that site and date range.
- “Compare search performance for example.com between last month and the previous month.” – This would use a comparison tool to show differences between two time periods (perhaps even with a chart if you ask for visualization).
- “What are my top 10 pages by clicks for the last 30 days?” – Should return a list of pages with the highest clicks in the last month.
- “Show me search trends by week for the last 3 months.” – Might return a weekly breakdown of impressions/clicks.
Claude might ask for clarification or parameters if needed (for example, if you have multiple sites, it might ask which site to use, or if you didn’t specify dates it might assume a default or ask).
The response will include data fetched via the Google Search Console API and often some analysis from Claude. For instance, Claude could highlight which queries have low click-through rate or generate a chart URL. If you ask for a chart (like “Generate a bar chart of my top 5 queries by clicks”), Claude will produce a link to an image chart or show it directly if the client supports it
Feel free to experiment with the prompts. The repository documentation suggests the server has about 17 different tools for various GSC functions (listing sitemaps, inspecting URLs, etc.). You can ask Claude to “list tools” to see all available tool names now that the server is integrated
If everything went smoothly, you have successfully set up and tested the GSC MCP server!
Troubleshooting
Setting up any new tool can come with hiccups. If you ran into issues or something isn’t working as expected, here are some common problems and their solutions:
1. The Search Console tools don’t show up in Claude. If after restarting Claude you do not see any indication of new tools:
- Restart Claude Desktop: Sometimes the tools might not appear immediately. Fully quit Claude Desktop and launch it again. On Windows, ensure the process is ended (use Task Manager if needed) before restarting. On Mac, quit the app or use Activity Monitor to kill it, then reopen.
- Wait a Few Minutes: After adding a new MCP server, Claude might take a little time to load it. If it doesn’t show up right away, give it a minute or two and check again.
- Check Claude Settings: In Claude Desktop, go to File > Settings > Developer. You should see “Search Console Analytics” (or similarly named) in the list of MCP servers/clients. If it’s there, click it. It should show a status; ideally “running”. If it shows an error or not running, note what it says. (If you don’t see any Developer tab, make sure you have the latest version of Claude Desktop installed.)
- Check the Config File: If the tools aren’t loading, the configuration might not be set up correctly. Navigate to the Claude config file:
- On Windows, it’s typically at
%APPDATA%\Claude\claude_desktop_config.json. - On Mac, it might be
~/Library/Application Support/Claude/claude_desktop_config.json. Open this file in a text editor. Look for an entry for “Search Console Analytics” under"mcpServers". It should contain the paths you provided earlier. For example, it should have"command": "uv"and in the"args"you should see it referencingserver.pyand various packages, and an"env"section withGOOGLE_APPLICATION_CREDENTIALSpath. If this is missing or incorrect, you can manually paste the configuration snippet from the documentation and insert your file paths, then save the file. (The snippet was given in the GitHub README;mcp installshould have done it for you, but manual editing is a fallback.)
- On Windows, it’s typically at
- Credentials File Location: Ensure the service account JSON file is stored in a location that is accessible. If you put it in a protected system folder, the server might not be able to read it. A good place is your user’s Documents folder or similar. Avoid paths with spaces or special characters if possible, or ensure they’re properly quoted in the config. If you suspect an issue, you can move the JSON to a simple path (like
C:\Users\YourName\gsc-key.jsonor/Users/yourname/gsc-key.json) and update the config to point there. Also, the environment variable name must be exactlyGOOGLE_APPLICATION_CREDENTIALS. Misspelling it will cause the authentication to fail. Double-check the config for typos.
2. “spawn uv ENOENT” error on Mac: If you’re on macOS and when starting Claude Desktop you see an error like “spawn uv ENOENT”, this means Claude tried to run the uv command but couldn’t find it. It implies that uv isn’t in the system PATH for Claude to use
- To fix this, you can provide the full path to the
uvexecutable in the config. Find where uv is installed by runningwhich -a uvin your Terminal. This will show the path, e.g./Users/yourname/.local/bin/uv(or wherever Homebrew/pip put it). - Open Claude’s config (Settings > Developer > Edit Config as above) and find the
"command": "uv"line for Search Console Analytics. Replace"uv"with the full path you found, for example"/Users/yourname/.local/bin/uv". Save the config and restart Claude. This directs Claude to the exact location of uv. - Alternatively, you can install uv via Homebrew which puts it in a standard location. For example,
brew install uv After that, try restarting Claude again. - Once fixed, the ENOENT error should go away and the server should start.
3. “pip not found” or Python not recognized: If during the setup, any pip or python command was not recognized, it means your Python installation isn’t in the PATH. Make sure to add Python to PATH (there’s an option during installation on Windows, or you might have to source your bash profile on Mac if installed via brew). As a workaround, you can call Python by its full path or use the Python launcher. For example on Windows, py -3.11 -m pip install uv could work. Ensuring a proper installation of Python where the commands work globally will save a lot of headaches.
4. API Access Issues: If Claude says something like “error: permission denied” or the output is empty when you know there should be data:
- Double-check that you added the service account email to Search Console with the correct permissions (Step 1). This is a common oversight. Without this, the API queries return no access. You can go back to Search Console settings and verify the service account is listed as a user. If not, add it and try again.
- Ensure the Search Console API is enabled on the Google Cloud project. If you skipped that when creating a new project, the service might be blocked. Go to the Google Cloud console API Library and verify it’s enabled (you should see it in the Enabled APIs list for your project).
5. Still not working? If you’ve tried the above and it’s still not working, consider retracing the setup:
- Does running
python gsc_server.py(orserver.py) manually in the terminal output any errors? (Make sure to do this within the venv.) It might show if something is wrong (like missing packages or config). - Check the console or logs in Claude Desktop’s developer settings for error messages. They often give a clue, such as a missing file or a syntax error.
- You can also seek help on forums or the GitHub repository issues page if something very specific is failing. The good news is that by following this guide, most common issues should be covered.